Accessing the Accessibility Checker
There are three ways to access the Accessibility Checker.
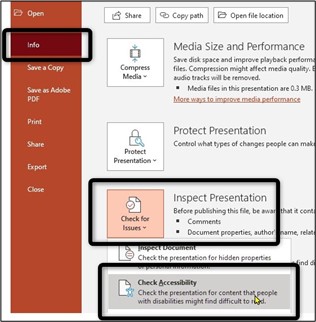
Through the File Tab
- Select File > Info.
- Select the Check for Issues button.
- In the Check for Issues drop-down menu, select Check Accessibility.
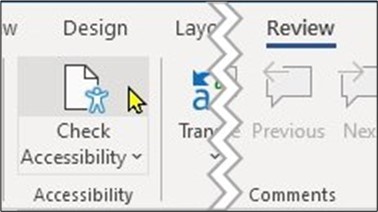
Through the Review Tab
- Select the Review tab on the menu bar.
- Select Check Accessibility.
Through the Accessibility Inspection Pane
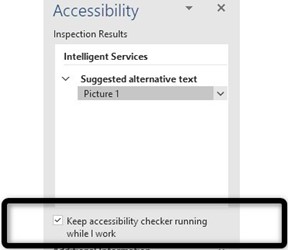
Once the accessibility checker is open, it will appear as a side panel on the right side of your document. If you check the box beside Keep the accessibility checker running while you work, you will see the accessible status of your document in the bottom left area of the application.
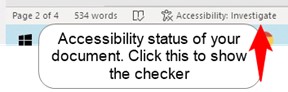
Selecting the accessibility status message at the bottom left-hand side of the document will reopen the accessibility checker side panel.
Navigating the Accessibility Checker
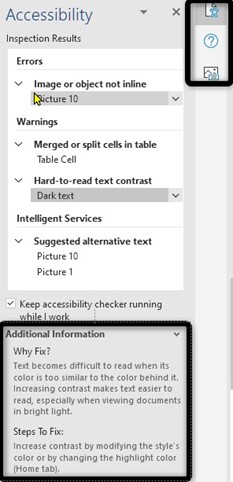
When you open the Accessibility Checker, you will see a user interface with three sections:
- Errors
- Warnings
- Intelligence Services
Only the relevant sections will be visible. The Microsoft accessibility website provides detailed descriptions of the inspection results sections. We recommend you attend to all the sections presented.
Under each section you will see a description of the issue and an indication of all the areas in your document with this issue.
When you click on the issue, the Additional Information area will outline why the fix is important and the steps to fix it. If you have other side panels open, you can switch between them using the icons to the right of the dialogue box.
When you select an issue, it will bring you to the affected location in your document. Beside the selected issue, you will see a down pointing arrow. When clicked, it offers a solution to the issue.
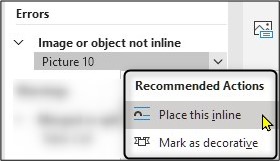
In the preceding screenshot, you can see the Place this inline recommended action. If chosen, it will automatically apply this action to the corresponding picture. Sometimes, selecting the recommended action will open a dialogue box in which you can remedy the issue.
Limitations
It’s important to note the Microsoft Accessibility Checker cannot check for issues it has no context about. For example, if your MS Word document lacks clear structure, you should use heading styles to divide the information into comprehensive sections. However, the Accessibility Checker won’t tell you to do this because it can’t understand your content.
Likewise, the checker will not indicate if your document would benefit from extra whitespace, requires a list to use bullets, or if a complex image in PowerPoint has a colour contrast issue. Manual checks for these issues are required. The Microsoft support website outlines some more Accessibility Checker limitations.
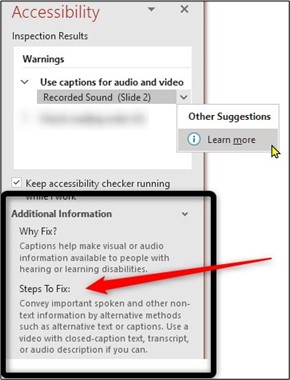
If the accessibility checker cannot solve the accessibility issue you may see an option that says Learn More.
In this case, it’s best to refer to the Additional Information area and follow the Steps To Fix.
The Learn More option brings you to a webpage with general information about the Accessibility Checker, rather than telling you how to fix the issue.
Explore our Other Articles
Since the Accessibility Checker cannot catch all issues, it is important to know how to create accessible documents. Please refer to our articles on making content accessible for your specific application:
Summary and Key Takeaways
The built-in Microsoft Accessibility Checker is available in almost every Microsoft application used to create documents. By using it and correcting the identified accessibility issues, you can pave the way of success for students with disabilities and help provide a level playing ground for all.
Note: These instructions apply to the current desktop versions of the Microsoft 365 Office Suite as of October 2021.