
There are two sides to accessible PDFs:
Creating an Accessible PDF
Most PDFs are created by converting source documents from applications such as Microsoft Word. The accessibility features in the source document transfer to the PDF once converted. If the PDF has accessibility issues after converting the source document, accessibility features can be added to the PDF using Adobe Acrobat Pro DC however, this can be difficult and time-consuming. The best way to reduce this effort is to make the source document as accessible as it can be.
Accessible Source Documents
- PDFs that are converted from source documents are only as accessible as those source document itself.
- While PDFs can be remediated after converting, it is almost always easier to remediate the source document than the converted PDF.
- The key to creating accessible PDF documents therefore is knowing how to create an accessible source document.
The following articles outline how to create accessible Microsoft Office documents:
Note: It is not recommended to convert Excel spreadsheets to PDF. It is better to share the original excel file. If you need to prevent readers from deleting, copying worksheets, or renaming tabs you can create and share a protected workbook (microsoft.com).
Converting Source Documents to PDFs
To transfer the accessibility features from the source document to the newly created PDF, they must be converted correctly. For example, if you use a print option to create a PDF, it will not transfer any accessibility functionality to the converted document.
The following steps should be followed when converting a source document using Microsoft Word or PowerPoint.
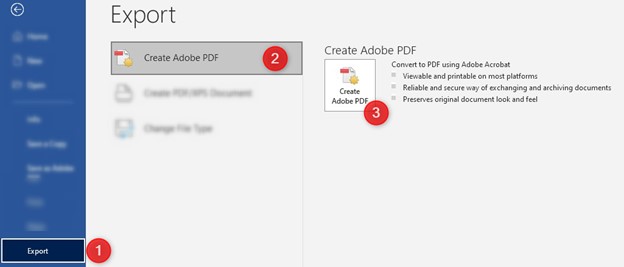
- Select File > Export. You will be presented with different ways to export the document.
- Select Create PDF/XPS. You will be prompted to use the accessibility checker if issues are detected in the document.
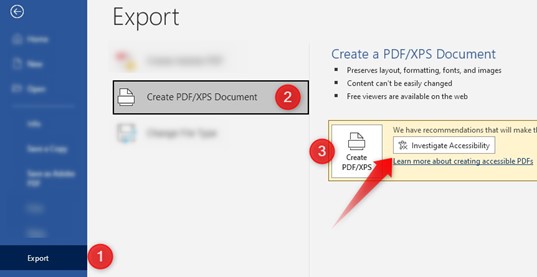
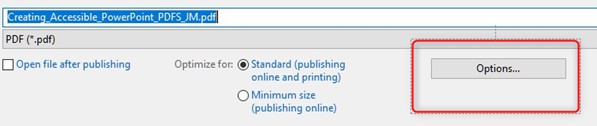
- When you click Create PDF/XPS, you will be required to enter a filename.
- Select the Option button to ensure the accessibility features are enabled.
- When you click Create PDF/XPS, you will be required to enter a filename.
- Select the Option button to ensure the accessibility features are enabled.
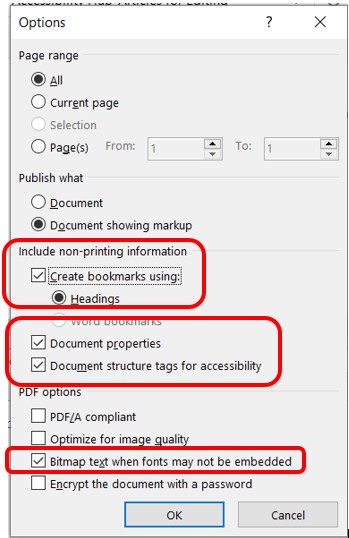
MS Word Export Options
Ensure the following features are selected when using MS Word PDF export:
- Create bookmarks using > headings.
- Document properties.
- Document structure tags for accessibility.
- Bitmap text when fonts may not be embedded.
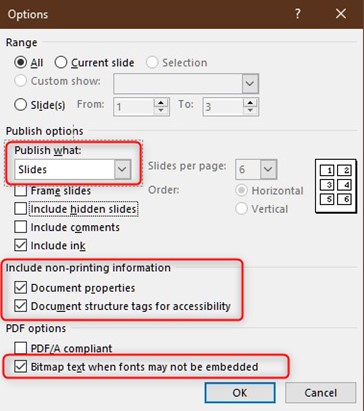
PowerPoint Export Options
Ensure the following features are selected when using PowerPoint PDF export:
- Publish what > slides.
- Document properties.
- Document structure tags for accessibility.
- Bitmap text when fonts may not be embedded.
Note: Printing slide decks with space for notes by changing the Publish what: setting to handouts, can be useful for students who are writing notes by hand, but is not recommended when converting to a PDF. For this reason, it’s best to provide the original PowerPoint file so students can choose this when printing if desired.
Acrobat PDF Maker Export Options
If you have an Acrobat PDF Maker application, it will be listed as a separate export option.
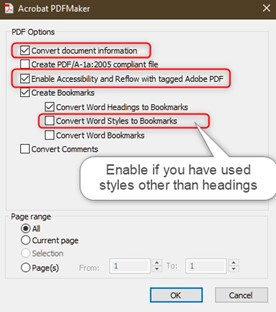
Ensure the following features are selected when using Acrobat PDF Maker export:
- Convert document information (this transfers your metadata often accessed by screen readers).
- Enable Accessibility and Reflow with tagged Adobe PDF.
- Create Bookmarks.
If you have used styles other than headings check the Convert Word Headings to Bookmarks option.
This is not a typical option to enable however if you used styles such as strong or emphasis, this option will transfer them to the PDF.
Evaluating the PDF
Once you have converted the source document, the next step it to evaluate how accessible the PDF document is. Adobe Acrobat Pro DC is needed to check the document for accessibility issues. The video below shows you how to use the Accessibility Check in Adobe Acrobat Pro DC.
Remediating an Accessible PDF
The most common accessibility issues in a PDF include:
- Document structure (tags)
- Alternative text (“alt text”) for Images
- Language and title
- Scanned documents: images of text
- Bookmarks
- Forms
- Reading order
- Missing spaces and line breaks
- Tables
The following resources can help you to fix these issues:
- Guide: 10 Common PDF Accessibility Errors with Solutions
- Video: Checking PDF for Accessibility
- Webinar: Remediating an inaccessible PDF
Summary
Creating accessible PDFs can be a simple or a complex task depending on the content of the document. Following the following four steps can help to ensure your PDFs can be used by everyone.
Following the following four steps can help to ensure your PDFs can be used by everyone:
- Create an accessible source document
- Convert the source document correctly
- Check the PDF for accessibility issues
- Fix any accessibility issues in the PDF