
Welcome
If you’re feeling lost or new to web accessibility, the following articles will help contextualize the content within this article, if read first:
Introducing WYSIWYG
For website content creators, reading and formatting content is the most important component of achieving website accessibility. As a content creator, you will be working within a WYSIWYG editor (What You See Is What You Get editor) to write and format content for webpages. They allow content editors to create webpages without knowing code. Learning to use WYSIWYG editors properly is key to producing content that can be accessed by everyone, regardless of ability.
Specific screenshots and instructions in this article will be provided based on the WordPress.org CMS, however the concepts and strategies provided would be useful in many web authoring situations.
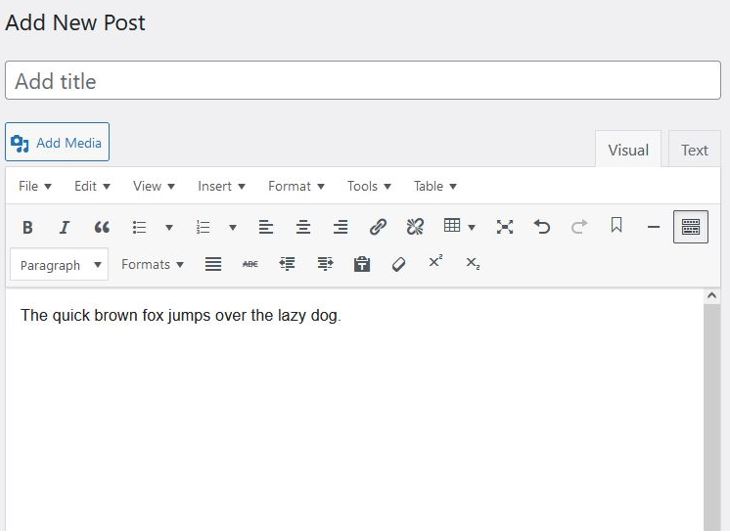
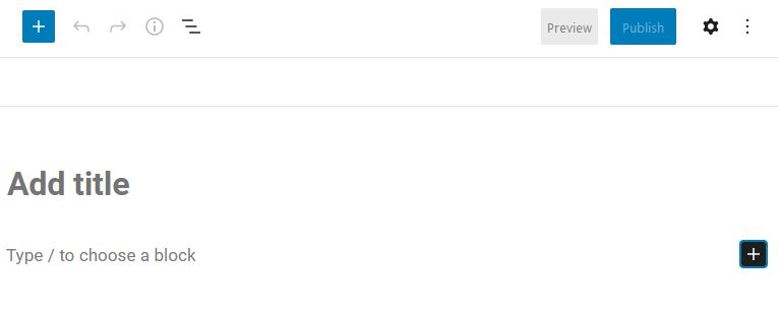
WYSIWYG Examples
Below are two examples of WYSIWYG editors that might be used in the WordPress Content Management System. If you are using WordPress, your editing interface might look different depending on what plugins are installed.
Getting Started
There are two important steps to creating and formatting accessible content:
- Ensuring there is no unwanted formatting (hidden or otherwise) in your written content.
- Using the tools provided in the WYSIWYG editor to apply the formatting needed, which is called ‘semantic markup’. Marking up your content with these tools ensures that underlying code is created accessibly.
Preparing Clean Content
When creating web content, it is always best to write your content directly in the WYSIWYG editor. But, if you will be pasting content into the editor instead (which is more likely), you will want to ensure that your content is clean and free of extra formatting.
Assuming you are writing your content in Microsoft Word, we recommend the following:
- Focus on including content, headings, and lists.
- Use the headings bar when creating headings. Headings and subheadings should be hierarchical. Don’t just change the text size. Learn more about writing titles and headings and formatting titles and headings. Learn more in the Creating Accessible Word Documents article.
- Don’t worry about styling the content. Don’t change the text size or colour. Don’t change the line spacing. Use the default font. Don’t apply extra fonts.
- Do not add two spaces after periods. One space is sufficient.
- If you need to paste in content from other sources, follow these instructions from Microsoft to use the Paste Text Only feature. This will strip all extra formatting, ensuring that only clean content makes it to your webpage.
- Do not worry about mocking-up the content to make it look like a webpage.
Pasting Content into the WYSIWYG Editor
Once your content is ready, it’s time to paste it into the WYSWIYG editor.
Pasting in content that you created using clean content steps above
If you wrote your content using the steps above, you should be able to paste it into either version of the WordPress WYISWYG editor and most other CMS WYSIWYG editors without any issues.
Pasting in content from other sources
Sometimes we must copy content from other sources — like websites, articles, e-books, and other Word documents. This content might have hidden formatting that we don’t want to bring into our editor. When content is pasted into a WYSIWYG editor, this formatting can come along for the ride, and may create a frustrating experience when you try to edit it or mark it up later. It may also cause confusion for adaptive technologies when trying to read your content.
The solution to this is something called converting to plain text. This process is also called stripping HTML. Prior to pasting the content into the editor, it is converted to plain text. Once it’s been converted, it can safely be pasted into your editor.
Please note that converting to plain text will remove all formatting. This is intended. Once the content has been stripped, it will be marked up in the WYSIWYG editor.
Some methods of converting to plain text are described below.
WordPress CMS Classic Editor
If you are using the WordPress CMS Classic Editor, you can convert to plain text and paste into the WYSIWYG editor in 1 step.
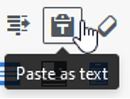
Look for the Paste as Text toggle.
Click this once to toggle on Paste as Text mode, then paste your text into the editor. Once you are done, click it again to toggle it off.
Many other Content Management Systems have a similar feature. Look for a tool called, Paste as plain text or Strip formatting.
Microsoft Word
Follow these instructions from Microsoft to use the Paste Text Only feature.
Paste your text into a new Word document, and then copy/paste it into your WYSIWYG editor. This is an interim step, so you do not need to save the Word document.
Online Tools
There are several online tools that perform this function, including www.striphtml.com and codebeautify.org/html-stripper.
Paste your content into the box provided and click Strip HTML. You will then copy/paste the stripped content into your WYSIWYG editor.
Marking Up Content
Applying the formatting tools found in a WYSWYIG editor is called ‘marking up’ content. These formatting tools include headings, lists, bold, italic, hyperlinks, and so on. When you markup content in your WYSIWYG editor, the underlying code is built in a way that is accessible — and not just to adaptive technologies. Properly marked up content is more accessible to search engines as well. It is critically important to mark up your content using these tools.
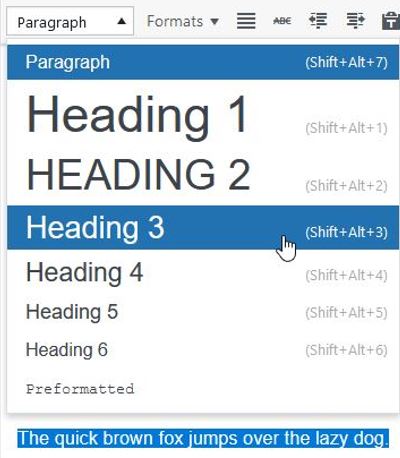
To mark up content in the WordPress CMS Classic Editor you highlight it, then select a formatting option. It works the same as Microsoft Word and other word processors.
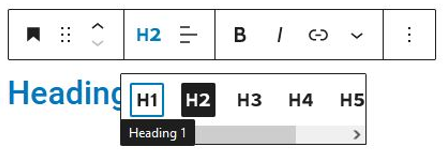
In the WordPress Gutenberg Editor every component of a page is called a ‘block’. The example screenshot depicts a heading block, which can be set to a heading level.
Moving on to Writing and Formatting Content
With this introduction complete, you are ready to continue to the Writing Content and Formatting Content articles.
The Writing Content article describes how to write your content to ensure that it meets accessibility guidelines. The Formatting Content article describes how to use the mark up tools within your WYSIWYG editor properly.